Tools
Creating mods for Airships requires no programming skills. All game information is stored in JSON, which is a standard text-based data format a bit like XML. Graphics are stored as PNG files, and sounds as OGG, which is an open source audio format similar to MP3.
Pretty much any text editor and graphics program will do to create mods, but here are the programs I use. They're all free and mostly open source, and available for Windows, Mac, and Linux:
- GIMP, an open source Photoshop clone. Yeah, the name is weird.
- Notepad++ for Windows, or TextMate for Mac. On Linux, use whatever standard text editor - xed or pluma or whatever - is installed by default.
- Audacity for audio editing.
Where to find things
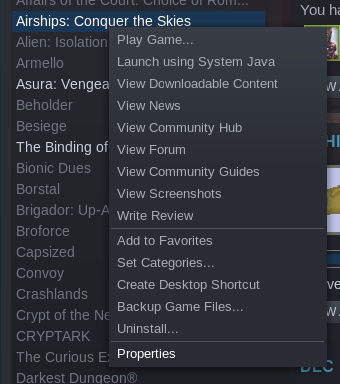
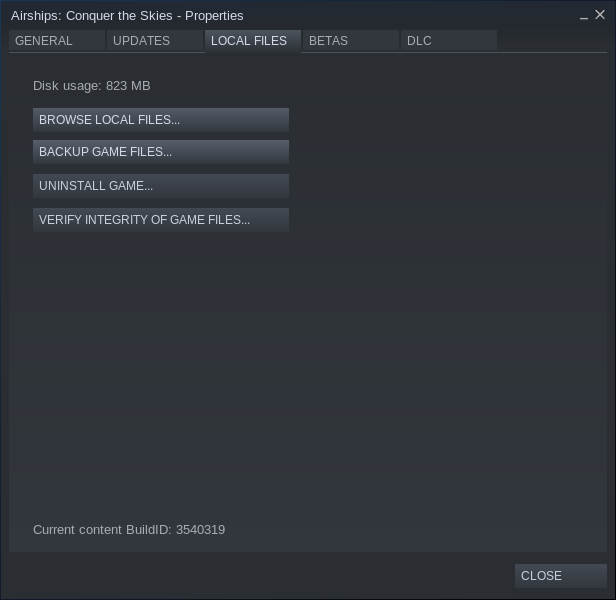
To find the game install directory in Steam, right-click on the game in the Steam library, choose "Properties", go to the "Local Files" tab and click "Browse Local Files".
Mods are installed in the mods folder in the game user folder. Mods installed from Steam can be found in steam/mods.
How to find the game user folder:
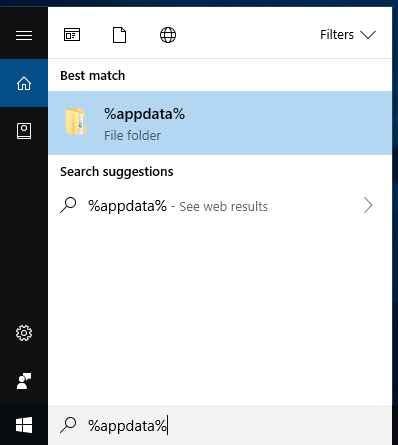
- Windows: Open the start menu, type %APPDATA%, and press enter. A folder will appear, containing a folder called AirshipsGame.
- Mac: The user folder is called AirshipsGame and is in your Documents folder in your home folder.
- Linux: The user folder is called .airshipsgame and is in your home folder. The dot prefix means that it's hidden by default.
How mods work
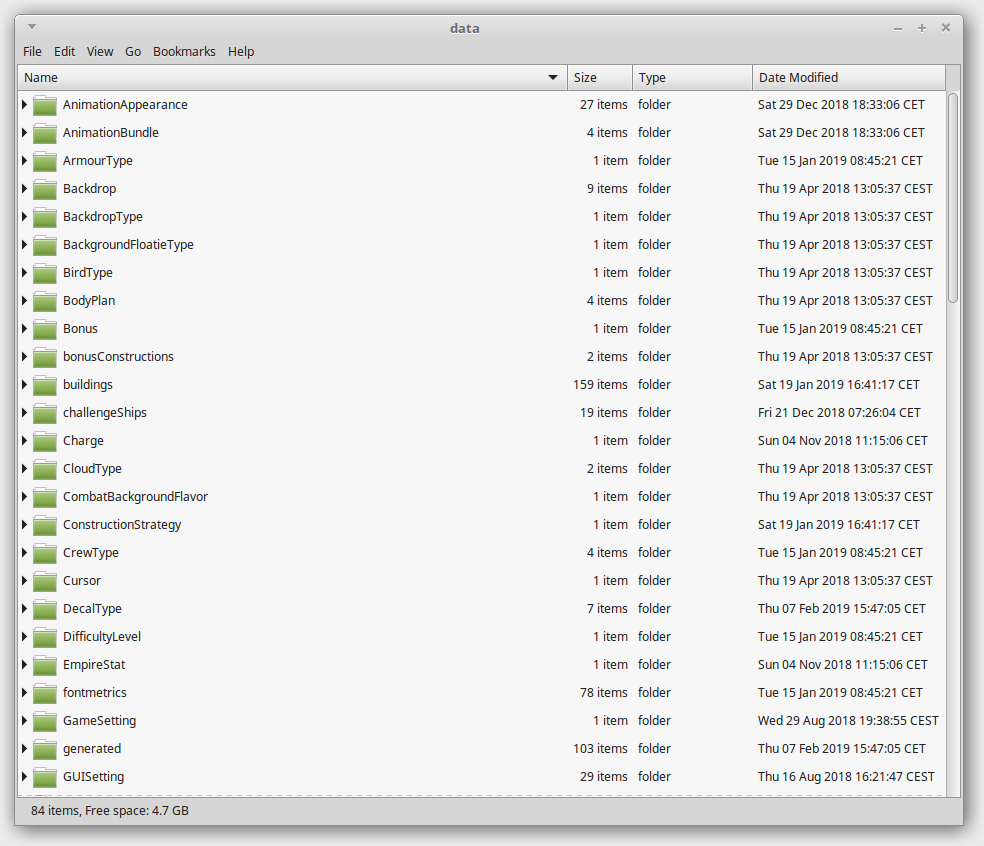
The game's data is organized into loadable entities which are stored in the data folder in the game's install folder.
Inside the data folder, each entity type has its own folder, which contains JSON files, which contain lists of entities.
The main data folder:
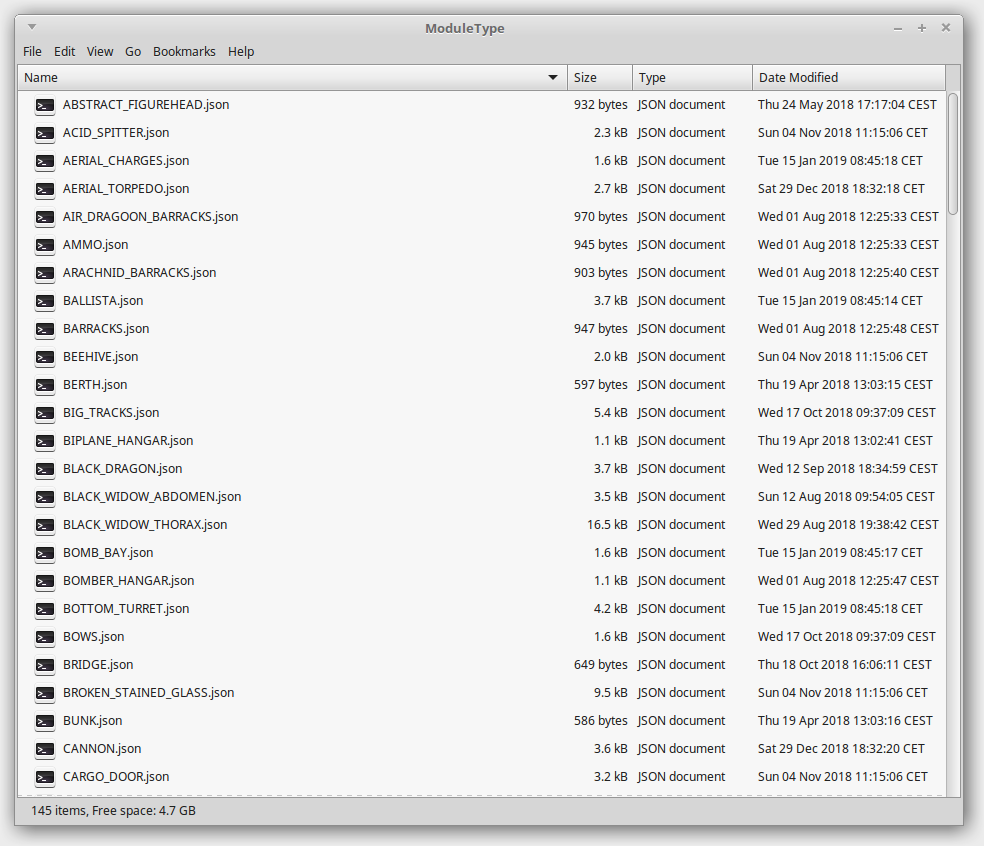
The ModuleType folder inside it:
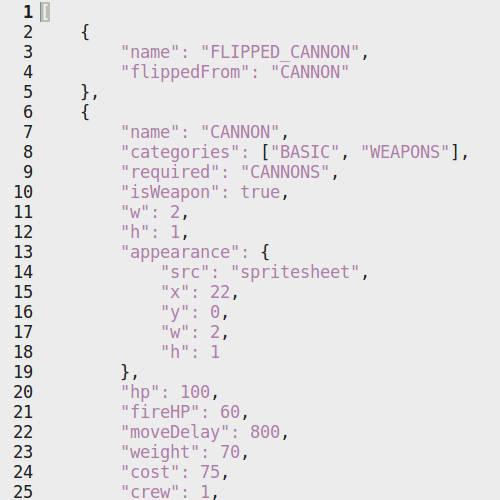
The JSON definition for a cannon inside the ModuleType folder:
Mods work by adding and replacing entities. If a mod specifies an entity with a new name, it's added. If it's an existing name, the old entity is replaced. The file structure of a mod is basically the same as that of the data folder.
So if you want to figure out how to mod a new thing, go into the data folder, find the entity type you want to change, and look at the JSON. Then copy over some entities into a mod, and start changing things around to observe the effects.
Basic mod structure
At a bare minimum, a mod is a folder containing a correctly formatted info.json file.
This is a valid if pointless mod:
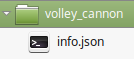
info.json:
{
    "id": "volley_cannon",
    "name": {
        "en": "Volley Cannon",
    },
    "description": {
        "en": "Small-caliber cannon that rapidly fires four shots in a row.",
    }
}
To make the mod actually do something, add folders with entities in them.
Example mod
So here's a more complete mod, adding a new module, a volley cannon. Apart from info.json, it contains a ModuleType folder to specify the new module, images and SpritesheetBundle folders for the new spritesheet for the module's appearance, a strings folder for the text in the mod, and a logo image file.
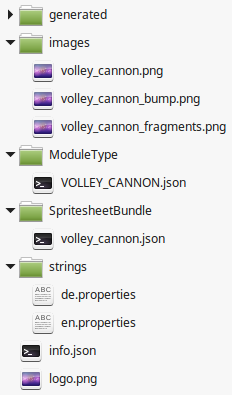
Ignore the "generated" folder - it's where the game caches stuff it produces during the "generating graphics" phase when it first loads a mod, or loads a changed mod. You can always delete it and the game will re-create it.
You can download this example mod here. Unzip it and put it into the mods folder to try it out.
Graphics
Graphics in the game are stored in 1024x1024px spritesheets. They are defined as SpritesheetBundle entities, which consist of an image and optionally a bump map and a fragment map. The bump map is used by the game's lighting engine to light up different parts of the image depending on where the light comes from. The fragment map is used to generate a damaged appearance for the module, and to generate pieces that fly away when the module is destroyed.
(You can also use spritesheets of different sizes, but they need to be square and sized as a power of two, so e.g 256x256 or 2048x2048. To make sure they work on people's computers, don't use sizes above 4096x4096.)
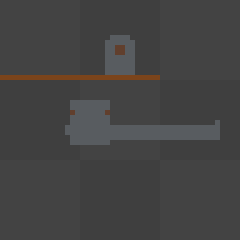
The raw spritesheet looks fairly drab, because most of the structure you would expect to see in the images is created by the lighting effects. For example, a steel wall is a simple grey square.
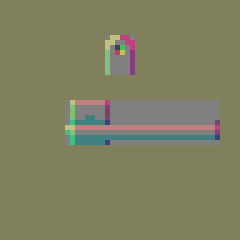
Each color channel in the map stores a different piece of information: red indicates the vertical angle, green the horizontal angle, and blue the shininess.
Let’s take this small ammo store as an example:

In the red channel, pixels that are on upwards-facing parts and edges are a brighter red, while downwards-facing pixels are darker. A value of 255 is for pixels that are strongly lit from above, 192 for more weakly lit pixels, 128 for pixels lit equally from above and below, 64 for ones lit from below, and 0 for ones strongly lit from below.

The green channel works the same, but showing the horizontal lighting, with 255 meaning strongly lit from the left.
The blue channel indicates how strongly a pixel should be lit. The default value is 92, but metal objects should have one of 128, and recessed bits can have one of 48. In this example, you can see that the metal shells are a brighter blue than the rest.

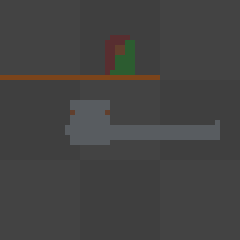
In the fragment map, each separate fragment is a differently-coloured region in the map, while white pixels indicate parts that do not become fragments.

You can download a GIMP file here which consists of nicely set up layers to create a spritesheet, bump map, and fragment map.
Example graphics
In the example mod, the spritesheet image consists of a 32x16 - 2x1 tile - module picture and a picture of the barrel. Both the module and the barrel have a bump map to make them lit correctly, and the module also has a fragment map. So when the module breaks, the cannon's carriage breaks in half.
Sprite sheet with the module graphic and barrel:
Bump map:
Fragments map, shown as an overlay:
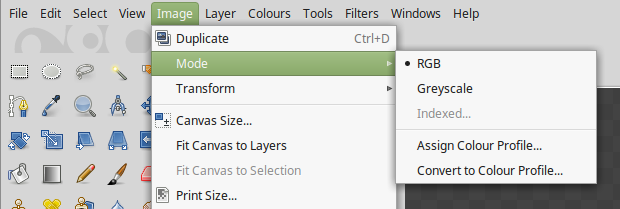
Gotcha: When saving PNG images for the game, make sure that the color mode is set to RGB/RGB32, and not Indexed Color.
In GIMP you control the mode through the Image menu. In other programs, eg Paint.NET, you set the mode when you save the image.
The SpritesheetBundle entity then links to those images.
Note that the name of the SpritesheetBundle is always the same as the image, and that the .png extension is added automatically.
[
    {
        "name": "volley_cannon",
        "bump": "volley_cannon_bump",
        "fragments": "volley_cannon_fragments"
    }
]
Example module type
Now we come to the meat of the mod, the new module, defined in ModuleType/VOLLEY_CANNON.json.
JSON files are always formatted as a list, even if they only contain one entity.
[
Rear-facing version of the volley cannon. Using flippedFrom, it's automatically derived from the front-facing one defined below.
    {
        "name": "FLIPPED_VOLLEY_CANNON",
        "flippedFrom": "VOLLEY_CANNON"
    },

    {
The name of the entity. If this was the name of a pre-existing module, it would overwrite that module.
"name": "VOLLEY_CANNON",
The editor categories this module can be found in. You can add more categories by adding ModuleCategory entities.
"categories": ["WEAPONS"],
This module requires the CANNONS bonus. Bonuses are flags used to control access to things and modify their stats. The effects of coats of arms and technologies are done via bonuses. You can define new bonuses by adding Bonus entities.
"required": "CANNONS",
Flag to let the game know this is a weapon.
"isWeapon": true,
The width and height of the module, in tiles. A tile is 16x16 pixels.
        "w": 2,
        "h": 1,
The appearance of the module. Appearance coordinates are counted in tiles. The src references the SpritesheetBundle defined above.
        "appearance": {
            "src": "volley_cannon",
            "x": 0,
            "y": 0,
            "w": 2,
            "h": 1
        },
Maximum hit points.
"hp": 100,
HP below which the module may catch fire. So the higher this is, the more flammable.
"fireHP": 60,
Number of milliseconds a crew member needs to move through one tile of a module. 800 is normal for modules, 600 for spacious modules, and less for corridors and decks.
"moveDelay": 800,
Weight of the module.
"weight": 60,
Cost of the module.
"cost": 80,
Number of crew required to operate the module.
"crew": 1,
Number of total crew recommended for running the module. One to operate it, one to fetch ammunition.
"recommendedCrew": 2,
Number of guards to assign to the module if available.
"recommendedGuards": 1,
Require free space in front of the module.
"frontOnly": true,
Number of milliseconds between shots. This is only 300 because it's a rapid-fire cannon.
"reload": 300,
Number of milliseconds it takes to reload the weapon's clip. Instead of a single number, this expression changes value depending on whether the FASTER_CANNON_RELOAD bonus is available. Most numerical module type values can have these "bonusable" expressions.
"clipReloadTime": { "base": 3000, "FASTER_CANNON_RELOAD": 2400 },
Clip - number of shots in one reload cycle.
"clip": 4,
Inaccuracy, in a weird "standard deviation in tiles per pixel" format. Just look at other weapons to find sensible values. Here, it's using the same numbers as a normal cannon.
"inaccuracy": { "base": 0.0014, "PRECISE_GUNNERY": 0.0007 },
The degree to which the inaccuracy offset of the previous shot influences the next shot. 0.8 means that a shot's deviation from where it's actually aimed at is 80% the same as the previous shot, and 20% new.
"jitterMerge": 0.8,
Blast damage, which is one of the two major damage types, done by explosives, fire, and acid.
"blastDmg": 0,
Piercing damage, the other major damage type, caused by fast things hitting into things.
"penDmg": 20,
When a weapon fires, the ship it's on gets pushed back a bit.
"recoilForce": 0.5,
The arc within which the weapon can turn to aim at targets.
"fireArc": { "direction": "forwards", "degrees": 60 },
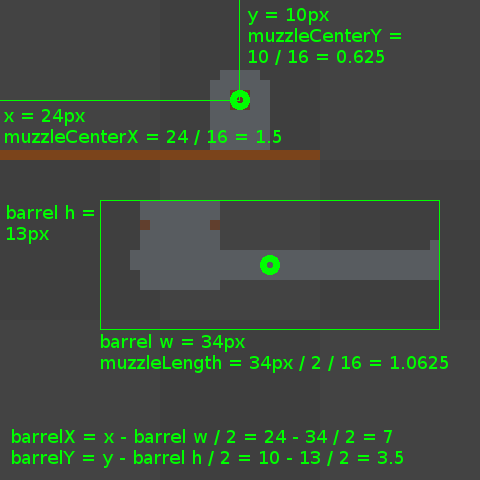
Now we get to a slightly painful bit. This is the location of the center of rotation of the gun barrel, specified in tiles. In our module graphic, this is at x = 24 and y = 10, which makes for x = 24 / 16 = 1.5 and y = 10 / 16 = 0.625.
        "muzzleCenterX": 1.5,
        "muzzleCenterY": 0.625,
How far away from the center of rotation the actual projectile should be spawned. For best results, make it just slightly longer than the amount by which the barrel sticks out. The barrel graphic (see below) is 34 pixels wide. It rotates around its centre, which means it sticks out 17 pixels, which is 17 / 16 = 1.0625. Round that up to 1.1.
"muzzleLength": 1.1,
This value is used by the AI to determine a good distance (in pixels) at which to fire the weapon. The more accurate the weapon, the bigger this value can be.
"optimumRange": 400,
The sound played when the weapon fires. You can have multiple layers with a bunch of options for adjusting volume and pitch, but this has been kept intentionally simple.
        "fireSound": {
            "layers": [
                {
                    "variations": [ "cannon0", "cannon1", "cannon2", "cannon3", "cannon4", "cannon5", "cannon6" ],
                    "volume": 1.1
                }
            ]
        },
The amount of HP below which the module may explode. As with fireHP, the higher this value is, the more likely it is to explode. SAFER_CANNONS is a bonus activated by a tech that makes cannon-type weapons no longer explode.
        "explodeHP": { "base": 30, "SAFER_CANNONS": 0 },
        "explodeDmg": { "base": 35, "SAFER_CANNONS": 0 },
Finally, we have weapon-specific appearance information. If isWeapon was set to false, this isn't needed.
"weaponAppearance": {
Location of the shot graphic. There already is a suitable 2x2 pixel in the default game spritesheet. Note that unlike as with the appearance, this is in pixels.
"shot": { "src": "spritesheet", "x": 64, "y": 304, "w": 2, "h": 2 },
Location of the barrel graphic, also in pixels. Note that the barrel graphic always rotates around its center, so add extra empty space around it to control the center of rotation.
"barrel": { "src": "volley_cannon", "x": 10, "y": 20, "w": 34, "h": 13 },
Here's another calculation, for the top left of the barrel graphic in its horizontal position. So barrelX is the x-position of the center of rotation minus half the barrel graphic width. As noted above, that x-position is 24, and the barrel width is 34. 24 - 34 / 2 = 7. The same calculation applies for barrelY. 10 - 13 / 2 = 3.5.
            "barrelX": 7,
            "barrelY": 3.5,
Finally, this is the number of pixels by which the barrel recoils when the weapon fires.
            "recoil": 4
        }
    }
]
So let's just go over the barrel calculation again using this illustration:
Example text
Next, let's look at the strings folder, which is where the game text is stored.
The keys for the text fragments are derived from entity names. For example, a module needs mod_MODULENAME and mod_desc_MODULENAME for its name and description.
mod_VOLLEY_CANNON=Volley Cannon
mod_desc_VOLLEY_CANNON=Small-caliber cannon that rapidly fires four shots in a row.
mod_FLIPPED_VOLLEY_CANNON=Volley Cannon (Flipped)
mod_desc_FLIPPED_VOLLEY_CANNON=Small-caliber cannon that rapidly fires four shots in a row.
You can look up the patterns in data/lang/en.properties, or just try out the mod without strings and take note of the bright red bits of text that indicate missing translation keys.

And here's the same thing in German, in de.properties:
mod_VOLLEY_CANNON=Repetierkanone
mod_desc_VOLLEY_CANNON=Kleine Kanone mit einem Magazin von vier Schüssen.
mod_FLIPPED_VOLLEY_CANNON=Repetierkanone (Umgekehrt)
mod_desc_FLIPPED_VOLLEY_CANNON=Kleine Kanone mit einem Magazin von vier Schüssen.
Mods support multiple languages, but you don't have to add languages beyond English.
Example logo and metadata
Because the mod supports English and German, the info.json now looks like this. The id should match the name of the mod folder.
{
    "id": "volley_cannon",
    "name": {
        "en": "Volley Cannon",
        "de": "Repetierkanone"
    },
    "description": {
        "en": "Small-caliber cannon that rapidly fires four shots in a row.",
        "de": "Kleine Kanone mit einem Magazin von vier Schüssen."
    }
}
Finally, we have logo.png. The logo image should be a 512x512px PNG in RGB color. It doesn't have to be anything intricate - a zoomed-in screenshot of what the mod adds to the game works very well.
![]()
That's it! If you want to make your own mod that creates a weapon, take the example mod, rename it, change the stats and graphics and text, and you're done!
Troubleshooting and publishing
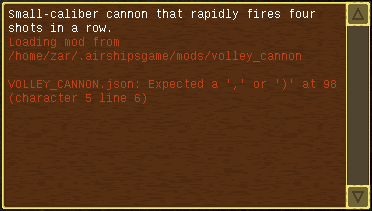
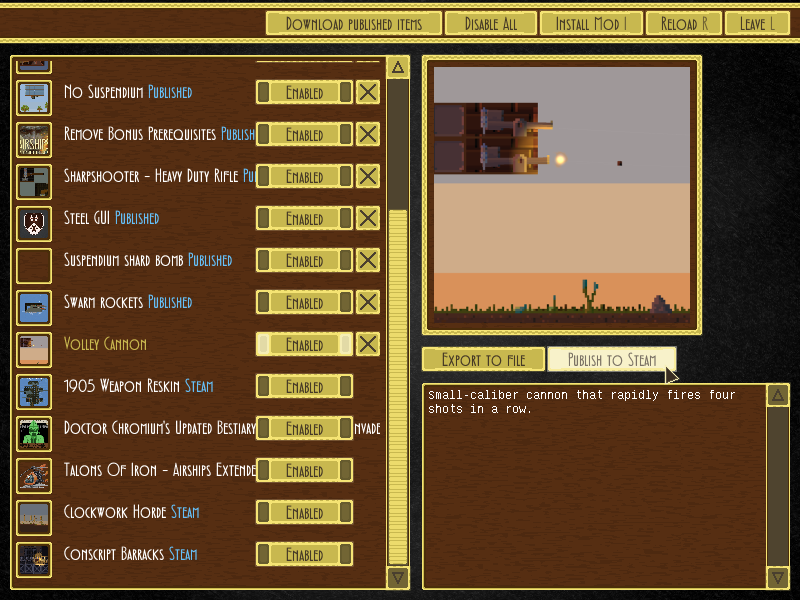
If there in an error with your mod you can see it in the mods screen.
Publishing mods: once you are done with your mod, you can click the "Upload" button in the mods screen to publish it to Steam. Or you can zip it up (including the enclosing folder) and distribute it manually.
And remember, if you need help, hop on the Discord or contact me directly.
And more
You can mod so many things, not just modules! Here's a list of all the things you can change and add to:
- Difficulty levels and other settings
- Map sizes
- Combat backdrops
- Landscape types
- Armour types
- Decal types
- Module types
- Crew and planes
- Technologies
- Heraldic charges
- AI fleet sets
- Monsters and monster nests
- Music
- GUI appearance
So there's plenty more to learn. You can figure this out by experimentation - download mods that do the kind of thing you want to do and dissect them - but I'm also happy to do a follow-up guide on e.g techs, AI fleet sets, or monsters. Let me know what interests you.