Note that you should know the concepts from the basic modding guide before reading this.
Introduction
There are actually two crew animation systems: the body part based one used by nearly everything, and a frame based one used by gargoyles and currently nothing else. The frame based one works much like other animations in the game, so if you want to animate non-humanoid crew, that's a good choice.
Before you get started, go into the game settings, and turn on Modding Tools. This makes the animation viewer available in the Info menu, which is an invaluable tool for letting you see and test animations.
And as always, it's worth reading the data files alongside the article so you can see more examples.
Referencing AnimationAppearances
Crew animations are used to show the current state of a crew unit. Are they walking, shooting, repairing, falling down, etc?
To specify this, CrewTypes reference one or more AnimationAppearances:
"animLook": "sailor",
or
"animLooks": ["pirate0", "pirate1", "pirate2", "pirate3", "pirate4", "pirate5", "pirate6", "pirate7", "pirate8", "pirate9"],
If using animLooks, each crew member uses a random AnimationAppearance from the list. Pirates don't have uniforms, after all.
A CrewType should also specify a simpleLook, which is an appearance, so the coordinates are in 16x16px tiles. Here's the one from the sailor.
"simpleLook": {
    "src": "spritesheet",
    "x": 0,
    "y": 14
},
Or you can use simpleLookImg, which uses pixel coordinates. Here's the one from the triplane:
"simpleLookImg": {
    "src": "spritesheet",
    "x": 742,
    "y": 390,
    "w": 67,
    "h": 37
},
The simpleLook is used for performance reason when the view is sufficiently zoomed out.
Frame-based Animation
AnimationAppearances specify what a particular crew type looks like. I'll cover frame-based animation first, because it's simpler, and then explain body part based animation.
Here's the AnimationAppearance for gargoyles:
{
    "name": "gargoyle",
    "frameAnimationBoundingBoxWidth": 15,
    "frameAnimationBoundingBoxHeight": 4,
    "frameAnimations": {
        "FLY_RIGHT": {
            "interval": 100,
            "dx": -11,
            "dy": -12,
            "src": "monsters9",
            "frames": [
                { "x": 497, "y": 5, "w": 35, "h": 27 },
                { "x": 497, "y": 33, "w": 35, "h": 27 },
                { "x": 497, "y": 61, "w": 35, "h": 27 },
                { "x": 497, "y": 89, "w": 35, "h": 27 },
                { "x": 497, "y": 117, "w": 35, "h": 27 },
                { "x": 497, "y": 145, "w": 35, "h": 27 },
                { "x": 497, "y": 173, "w": 35, "h": 27 },
                { "x": 497, "y": 201, "w": 35, "h": 27 }
            ]
        },
        "FLY_LEFT": {
            "interval": 100,
            "dx": -11,
            "dy": -12,
            "src": "monsters9",
            "frames": [
                { "x": 497, "y": 5, "w": 35, "h": 27, "flipped": true },
                { "x": 497, "y": 33, "w": 35, "h": 27, "flipped": true },
                { "x": 497, "y": 61, "w": 35, "h": 27, "flipped": true },
                { "x": 497, "y": 89, "w": 35, "h": 27, "flipped": true },
                { "x": 497, "y": 117, "w": 35, "h": 27, "flipped": true },
                { "x": 497, "y": 145, "w": 35, "h": 27, "flipped": true },
                { "x": 497, "y": 173, "w": 35, "h": 27, "flipped": true },
                { "x": 497, "y": 201, "w": 35, "h": 27, "flipped": true }
            ]
        }
    }
}
The frameAnimationBoundingBoxWidth and frameAnimationBoundingBoxHeight values are used to specify how big the unit actually is. They don't only get used for animations but also for the collision bounding box.
frameAnimations maps animation types to animations. Gargoyles have very simple animation needs, and so the only required values are FLY_RIGHT (fly to the right) and FLY_LEFT (fly to the left).
Frame animations have the following fields:
- interval: The interval between frames in milliseconds
- dx, dy: the horizontal/vertical offset of the animation relative to the center point of the unit
- src: The spritesheet the frames come from
- frames: the location of each frame
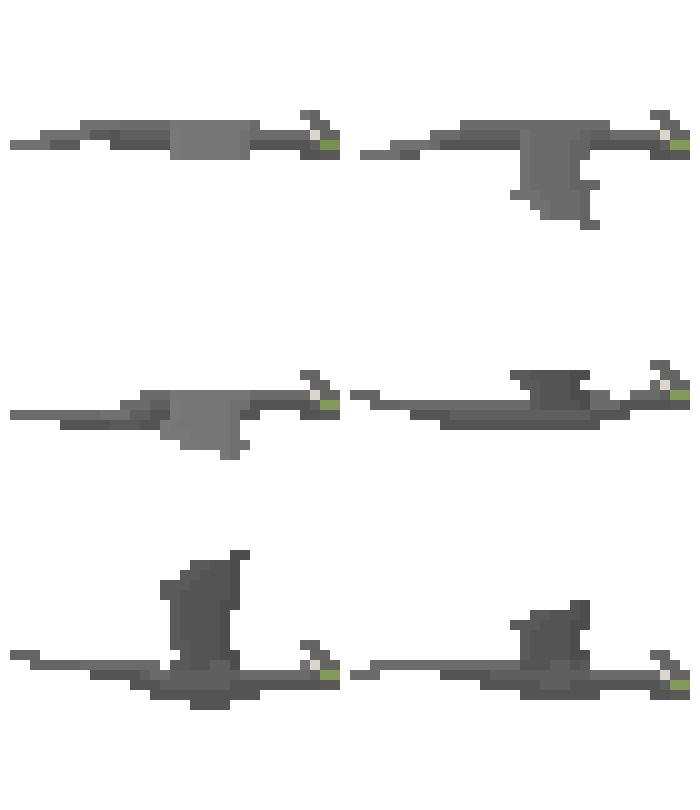
This is the resulting animation:

Animation Types
Here is the complete list of animation types:
- STANDING - Stand facing the player
- STANDING_LEFT - Stand facing left
- STANDING_RIGHT - Stand facing right
- WALK_LEFT - Walk to the left
- WALK_RIGHT - Walk to the right
- CLIMB - Climb up/down, eg on a ladder
- FALL - Uncontrolled fall
- JUMP_LEFT - Controlled jump to the left
- JUMP_RIGHT - Controlled jump to the right
- SHOOT_LEFT - Shoot something to the left (non-looping)
- SHOOT_RIGHT - Shoot something to the right (non-looping)
- REPAIR - Repair something
- WORK - Operate machinery
- GIVE_LEFT - Give an item to someone on your left (non-looping)
- GIVE_RIGHT - Give an item to someone on your right (non-looping)
- HANG_IN_THERE - Cling on to the outside of the ship
- CLIMB_SIDEWAYS - Climb sideways along the outside of a ship
- INJURED - Sufficiently injured to be out of action, but not dead
- HAPPY - When the crew's side wins
- SAD - When the crew's side loses
- COLLAPSE - Go from standing to INJURED or DEAD (non-looping)
- SHOT_FROM_LEFT - Hit by an attack coming from the left (non-looping)
- SHOT_FROM_RIGHT - Hit by an attack coming from the right (non-looping)
- WALK_LEFT_ARMED - Walk to the left, weapon at the ready
- WALK_RIGHT_ARMED - Walk to the right, weapon at the ready
- STANDING_ARMED - Stand guard, weapon at the ready
- DEAD - Dead or destroyed, no longer functional
- FLY_LEFT - Fly to the left
- FLY_RIGHT - Fly to the right
- FLY_DEAD_LEFT - Fly to the left while already dead (used by planes that crash instead of fully dying in midair)
- FLY_DEAD_RIGHT - Fly to the right while already dead (used by planes that crash instead of fully dying in midair)
- FLY_INJURED_LEFT - Fly to the left while injured/damaged but still operational
- FLY_INJURED_RIGHT - Fly to the right while injured/damaged but still operational
If a crew type can fly, implement at least FLY_LEFT and FLY_RIGHT. If they can walk and fly, implement at least STANDING. If they can't fly, implement at least STANDING.
Non-looping animations are ones that are only played once. For example, when a crew member fires a weapon, the shooting animation is played once, and then they return to whatever animation is now suitable, probably standing or walking.
Note that if a crew type can't do a particular thing, there's no need to create an animation for it. Fighting units that can't do crew work don't need the GIVE, REPAIR or WORK animations. Non-flying units don't need any of the FLY ones. And units that have minWorkingHP set to 1 can't be in an injured state.
This is all the information you need to create new CrewTypes with frame-based animations. Create an AnimationAppearance Loadable for your CrewType. Implement the relevant animation types, referencing a Spritesheet you created.
Body Part Animation Overview
The body part based animation system is defined by three Loadables:
BodyPlan defines a list of body parts and the order in which they're drawn. It does this from four sides: FRONT, BACK, LEFT and RIGHT.
AnimationBundle references a BodyPlan and defines the movement of those body parts for each animation type.
AnimationAppearance references an AnimationBundle and defines what each body part actually looks like from each side.
And CrewType references AnimationAppearance.
This means that multiple CrewTypes can use the same AnimationBundle but "skin" them differently using AnimationAppearances.
AnimationAppearances
A body part based AnimationAppearance specifies the appearance of each body part that its AnimationBundle uses, from all four sides. It has the following fields:
- name: As with all loadables
- bundle: The AnimationBundle it uses
- spritesheet: The spritesheet all the images come from
- images: A list of images of each body part from each side
Images have the following fields:
- part: The name of the body part. The list of body parts is specified by the BodyPlan the AnimationBundle uses.
- side: One of LEFT, RIGHT, FRONT, BACK
- x, y, w, h: The location of the image in the sprite sheet
- emitters: A list of particle emitters.
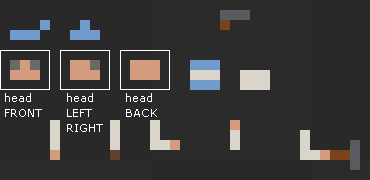
Here is the head of a sailor from the front:
{
    "part": "head",
    "side": "FRONT",
    "x": 81,
    "y": 261,
    "w": 5,
    "h": 4
},
Excerpt from the main spritesheet showing the body parts of a sailor, with the head images indicated:

Particle emitters have the following fields:
- type: Reference to the ParticleType they emit
- freq: Probability per millisecond of emitting a particle. So 0.001 means there's a particle roughly once per second.
- x, y: The location where the particles are emitted relative to the top left of the body part.
- scale: Scaling factor for the particles emitted.
Here is the abdomen of a mech spider with a smoke emitter:
{
    "part": "abdomen",
    "side": "FRONT",
    "x": 862,
    "y": 323,
    "w": 10,
    "h": 7,
    "emitters": [
        {
            "type": "smoke",
            "freq": 0.0003,
            "x": 5,
            "y": -3,
            "scale": 0.6
        }
    ]
},
Not all body part images need to be present. Missing ones will simply not be drawn.
The list of body parts in a human BodyPlan is as follows:
- backpack
- head
- hat
- torso
- abdomen
- left_leg
- right_leg
- left_skirt
- right_skirt
- skirt
- weapon
- left_arm
- left_arm_bent
- right_arm
- right_arm_bent
- right_arm_hammer: Used for repairing things
- right_arm_dagger: Used by cultists, who wield daggers instead of weapons
Cultists use the skirt images instead of the leg images, because they have robes. left_skirt and right_skirt swish around while skirt stays in one place.
Note that an AnimationBundle expects each body part image to be a certain size, often including a bunch of empty space around it.
Custom AnimationAppearances
To create a new AnimationAppearance for human crew, duplicate the set of body part images from an existing crew type and repaint/redraw it as needed in your new sprite sheet. If you put it in the same place in your new sprite sheet, you can even keep all the same coordinates, and only have to change the spritesheet value in the AnimationAppeaarance.
So if you want to create a new human crew type with normal human animations, this is as much as you need. You can create an AnimationAppearance that references the standard human AnimationBundle and "skin" it with your own graphics.
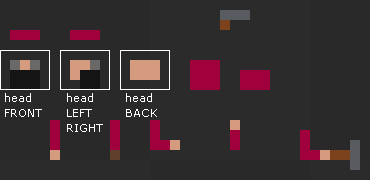
Here's the same sprite sheet part as before, but now redrawn to be some kind of priest with a big beard:

Custom Body Plans and Animations
Now let's say you want to make a completely custom crew appearance with its own BodyPlan and AnimationBundle.
Start out by defining what body parts the crew type has that need to move independently from one another. Body parts can also be weapons and carried items. Let's say we want to make a floating robotic crew member. Since it's floating it doesn't need legs, but it does need an arm to work with, and a weapon.
The body plan could look like this:
{
    "name": "floatbot",
    "FRONT": [
        "body",
        "weapon",
        "arm"
    ],
    "BACK": [
        "body",
        "weapon",
        "arm"
    ],
    "RIGHT": [
        "weapon",
        "body",
        "arm"
    ],
    "LEFT": [
        "arm",
        "body",
        "weapon"
    ]
}
Note how the draw order is different for LEFT and RIGHT because we're putting the weapon on the left side of the robot's body and the arm on the right.
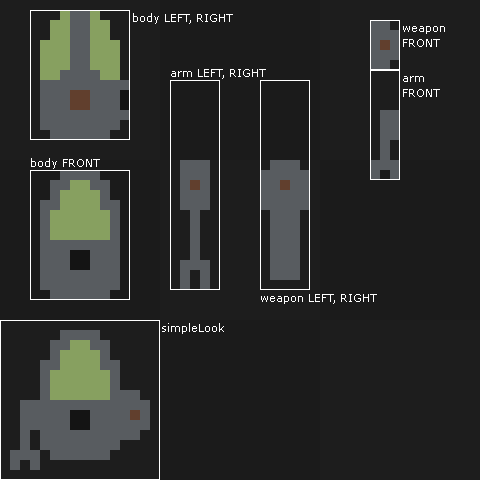
Next, let's draw the parts of the bot and put them into an AnimationAppearance. We need the body, arm, and weapon from the front and from the side. We can leave out the back as we won't need to show it from the back.
Here are the sprites and the image coordinates we'll use. Note how the gun and arm image are centered on the joint - images always rotate around their center in Airships. Also, if you want to make a crew member carry resources, note that the resource image will be drawn at the bottom center of the body part it's attached to. So arms should be pointing downwards in the sprite sheet.

AnimationBundles
Now we can create a new AnimationBundle that references that body plan and describes the animations. AnimationBundles have the following fields:
- name: As always with Loadables
- bodyPlan: References the BodyPlan the bundle uses
- width, height: The bounding box of the animation, and the hit box of the units that use it, in pixels
- animations: A list of animations
Animations have the following fields:
- type: The animation type, eg STANDING, CLIMB, etc. this animation is for
- side: Which side of the crew unit is drawn. As seen above, this affects the order in which the body parts are drawn.
- length: Used for non-looping animations to specify the length of the animation, in milliseconds
- parts: A list of animation parts, each indicating the location and movement of a body part
OK, now we get to the bit of this system which I do feel that I have to apologise for. The way you actually specify the movement of a body part.
An animation part has the following fields:
- name: The name of the body part
- x, y: The base position of the part, relative to the top left of the bounding box.
- holdsResource: If the crew unit is carrying a resource (e.g coal), draw the resource attached to this body part.
- cW, cH: Width and height of the circling motion described by the body part
- cPeriod: Period of the circling motion - how many milliseconds it takes to complete a circle
- cOff: Offset of the circling motion - how many milliseconds into the circular movement the animation begins
- wStart: Start angle of waving/rotating motion described by the body part
- wEnd: End angle of waving motion
- wPeriod: Period of the waving motion - how many milliseconds it takes to wave back and forth
- wOff: Offset of the waving motion - how many milliseconds into the waving movement the animation begins
Yeah. I'm sorry.
So the way this works is that you can make body parts describe circles, and you can make them rotate back and forth between two angles. For example, the movement of a spider leg is a circle, while the movement of a hammer being used is a waving motion.
By setting the width or height of a circling motion to 0 you can have an up/down or left/right motion. And for non-looping animations, you can use the offset values to make a body part move forward or backward.
So you can do quite a lot with this system, it's just fiddly to specify. It's worth looking at the human AnimationBundle and at human animations in the animation viewer to figure out how the animations are done.
Continuing with our example, our floating bot would want the following animations implemented:
- STANDING
- STANDING_LEFT
- STANDING_RIGHT
- WALK_LEFT
- WALK_RIGHT
- CLIMB
- SHOOT_LEFT
- SHOOT_RIGHT
- REPAIR
- WORK
- COLLAPSE
- DEAD
- FLY_LEFT
- FLY_RIGHT
It doesn't need the stuff for hanging onto the side of ships because it can fly, after all. And it doesn't need HAPPY/SAD because it's a robot.
So let's start by assembling a STANDING (well, floating) animation. We can start out by simply using x/y to position the images correctly:
{
    "type": "STANDING",
    "side": "FRONT",
    "parts": [
        {
            "name": "body",
            "x": 0,
            "y": 0,
        },
        {
            "name": "weapon",
            "x": 9,
            "y": 6,
        },
        {
            "name": "arm",
            "x": -2,
            "y": 3,
            "holdsResource": true
        }
    ]
}
To make the bot look a bit more dynamic, we can make the body wobble up and down slightly:
{
    "name": "body",
    "x": 0,
    "y": 0,
    "cH": 0.3,
    "cPeriod": 2400
}
So now the body wobbles up and down by +- 0.3 pixels every 2.4 seconds.
And we can also make the arm wave back and forth a bit:
{
    "name": "arm",
    "x": -2,
    "y": 3,
    "wStart": -0.05,
    "wEnd": 0.05,
    "wPeriod": 2400,
    "wOff": 600,
    "holdsResource": true
}
So now it waves between -0.05 and 0.05 radians every 2.4 seconds, but with a 1/4 phase offset, because that looks much nicer than moving in phase with the body.
So that's the basic way you animate stuff. One more example, of the attack animation. This one is a non-looping animation. We want the weapon to kick back as the bot fires.
{
    "type": "SHOOT_RIGHT",
    "side": "RIGHT",
    "length": 250,
    "parts": [
        {
            "name": "body",
            "x": 0,
            "y": 0,
        },
        {
            "name": "weapon",
            "x": 2.5,
            "y": -1.5,
            "wStart": 1.55,
            "wEnd": 1.55,
            "cW": -1,
            "cPeriod": 1000,
        },
        {
            "name": "arm",
            "x": 2.5,
            "y": -1.5,
            "wStart": -1,
            "wEnd": -1,
            "holdsResource": true
        }
    ]
}
The animation is 250 milliseconds long, which means we don't really care what happens to the parts afterwards. They would loop back around eventually, but we'll never see that.
The body and the arm are just in a steady position, but the gun uses the circle motion with a width of -1 and a period of 1000 to cause the gun to move backwards by 1 pixel during the 250 ms of the animation. In the next 250 ms it would move forward again, but we won't see that.
This is how you can do non-looping motions.
Here is the full example mod of the floating robot, with all the animations listed above implemented.
As always, feedback, follow-up questions, and requests for additional modding articles are welcome.